Regularities of changing the dimensions of the main bore of the cylinder of TMZ-450D diesel engine during the technological process
- 1 — Ph.D., Dr.Sci. Professor Tula State University ▪ Orcid ▪ Elibrary ▪ Scopus ▪ ResearcherID
- 2 — graduate student Tula State University ▪ Orcid ▪ Scopus
Abstract
The article deals with the problems arising during the mechanical and thermal treatment of the TMZ-450D diesel engine cylinder, which is the base part of the engines of small-sized generators and compressors, which are widely used for mobile units in the oil and gas and mining industries. It was found that the metal in the casting has a non-uniform structure, the density of which ranges from 6.75 to 7.25 g/cm3. Redistribution of dislocations and residual stresses in the casting leads to significant changes in the size and shape of the main bore. In addition to the successive changes in size specified by the technology due to the removal of the designated allowance, the dimensions and shape change arbitrarily, uncontrollably in the course of the technological process. It is shown that artificial aging by a thermal method does not provide the desired dimensional stability; therefore, it is proposed to supplement it with natural aging after rough boring for six months. It was revealed that the use of morally and physically outdated equipment makes it necessary to increase the number of finishing operations of honing and, accordingly, to increase the labor intensity of cylinder manufacturing. The use of a two-position boring machine is substantiated, on which the transitions of semi-finishing and fine boring are combined. This completely eliminates the copying of errors that arose when changing the base on previous operations. The use of a two-position modular boring machine ARS-4/Ts of increased accuracy and rigidity significantly increases the accuracy of the bore hole, which makes it possible to reduce the number of honing operations. A variant of the technological process of mechanical and heat treatment is proposed, including natural aging, the use of double boring on a modular boring machine, which will reduce the number of honing operations to one, including rough and finish transitions.
None
Introduction
In mining and geological exploration, modern methods of prospecting for minerals are widely used, based on the use of electrical machines and devices. The high-performance properties of these machines are ensured, among other things, by the improvement of their manufacturing technology. In work [1] the influence of thermal processes during machining on the output parameters of the product, the influence of the quality of design and manufacture of electric shut-off valves with rectilinear movement of the shut-off body are considered. The article [2] examines the modeling and control of the dynamic properties of technological systems in order to identify the most significant technological factors that affect the accuracy of manufacturing mining machines. The article [12] – is devoted to ensuring the adhesion strength of thermal gas coatings on the piston rings of mining transport engines, and the article [5] – is devoted to the wear resistance of the bearing assemblies of mining dump trucks operating in fretting corrosion conditions.
The Tula Machine-Building Plant produces diesel engines TMZ-450D with the capacity of 8 kW and mass of 59 kg, designed to drive municipal and road-building equipment, compressors, pumping units and autonomous electric units. The operational advantage of such units is the use of the same diesel fuel as for large-sized transport technological machines [5, 12].
In transport engineering, internal combustion engines are widely used, the basic parts of which are box-shaped cylinder blocks. The highest requirements for dimensional accuracy, shape and surface quality are imposed on the cylinder mirror. Moreover, it turned out to be more relevant for diesel engines due to the higher compression ratio of the fuel mixture. Box-shaped cylinder blocks of powerful engines have high rigidity, which allows the use of a typical technology for their manufacture [3].
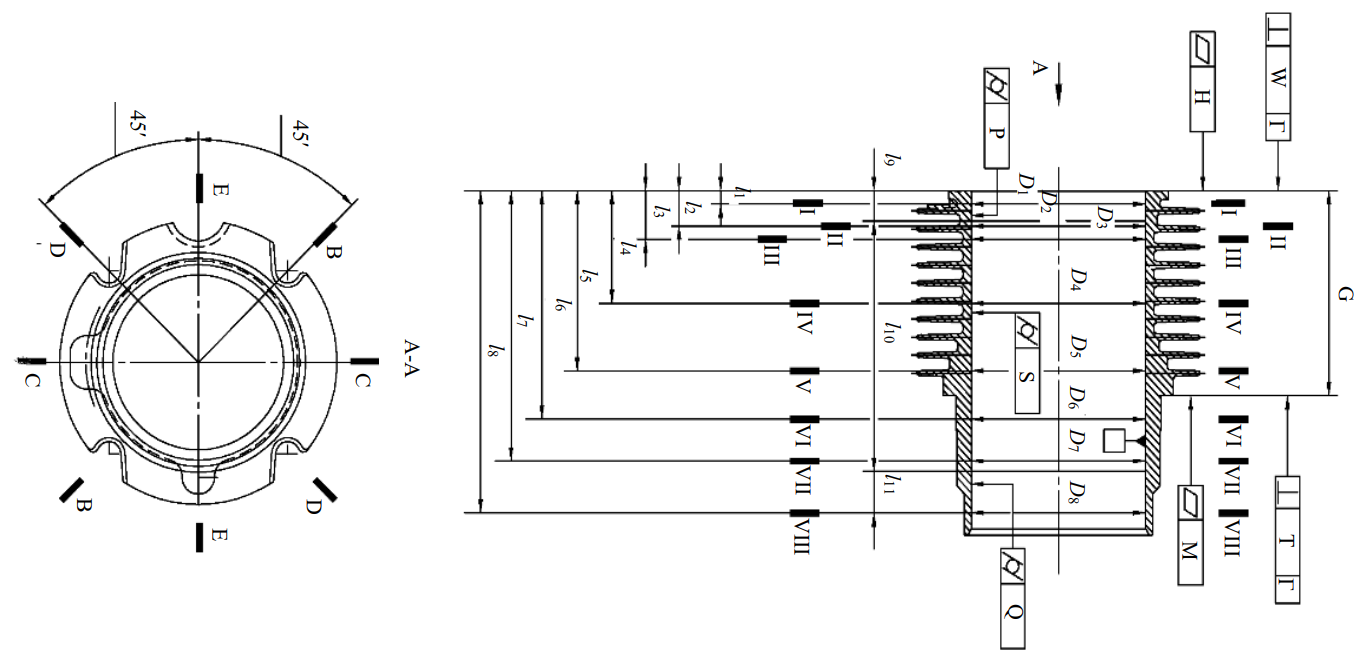
Fig.1. Sketch of the control operation of the technological process of manufacturing a cylinder
The basic part of TMZ-450D engines – a ribbed cylinder with cutouts for fastening in the ribs – has low rigidity, unevenly distributed over the cylinder (Fig.1) [9, 10]. The billet of the cylinder is performed by casting from special cylindrical cast iron with an accuracy of 11-0-0-16 in accordance with GOST R 53464-2009.
The thickness of the walls of the cylinder along the length and circumference, taking into account the ribs, has large differences (Fig.1). Shown are the longitudinal sections B-B-E-E and the positions of the cross-sections along the lengths l1-l8, in which measurements are performed on the Ares 10.7.5 inspection and measuring machine (IMM).
Requirements for shape and size accuracy are imposed on the finished part: deviation from cylindricality is not more than 0.005 mm, diameter tolerance is 95 + + 0.03 mm. On the mirror surface of the cylinder (Rz 0.2-0.7 microns), a sparse grid of diagonal cross lubricant depressions in depth (Rz 2-6 microns) is applied. Measurements are made on the SeytronicPSh
8-4 profilograph-profilometer, which automatically builds a profilogram of the measured surface along the relative length of the reference surface tp = 20 % [9, 10].
Formulation of problem
In the production of TMZ-450D diesel cylinders at the Tula Machine-Building Plant, all the classic recommendations for their manufacturing technology are used [9], in particular, the staging of operations, including several intermediate aging operations. In this case, some of the cylinders do not correspond to the quality of the mirror surface given by the Abbott – Firestone diagram [7].
Iron castings have a nonuniform density due to the complex composition and especially stey-crystallization. In work [9] an assessment of the influence of technological heredity on the accuracy of honed cylinder blanks by applying natural aging is given, and in the article [10] the influence of the inhomogeneity of the composition of the original workpiece on the processing efficiency of the engine cylinder mirror is considered. Researchers [8] substantiated approaches to predicting the mechanical properties of gray and ductile iron [16], authors [13] analyzed carbides in chromium cast iron, and scientists [14] investigated the microstructure and wear resistance of a new high-alloy wear-resistant cast iron.
The data obtained on the tomograph were converted into tomograms, from which it can be seen that the metal in the casting has an inhomogeneous structure with a density of 6.75-7.25 g/cm3 [9]. Presumably technological heredity will influence the accuracy of the finished cylinder [9, 10] during machining.
To maintain operational characteristics in the technology of production of basic engine parts - cylinders made of special cylinder cast iron – special techniques are used, including staging of mechanical cutting with successive removal of the allowance and refinement of the processed surfaces, as well as various aging options. Castings are artificially aged in an electric shaft furnace, heated for nine hours to a temperature of 490-510 ° C, then cooled in a furnace with an open lid to a temperature of 380-400 ° C, after which – in air.
The final precision and surface quality of the cylinder bore is traditionally ensured by honing [6], for the study of which modeling of the evolution of the bore diameter during fine honing [11], and also analysis of the technological efforts for precision honing [4], creation of the process models to control the honing force [15] were used.
Honing is a heat-intensive process [1], therefore, it requires an additional study of the influence of thermal processes on the stability of the achieved accuracy in time [10, 13].
Metodology
To identify ways to improve the technology, an operational analysis of the reasons for the appearance of defects was carried out [9]. It has been established that one of the main reasons is the inhomogeneity of the density of the casting, caused by this distortion of the cylinder shape during aging [9, 10] and thermal phenomena in the technological process [1].
The situation was aggravated by the moral and physical obsolescence of the equipment, in particular, the 16A20F3S39 CNC lathe and the 1R-TS95 finishing-boring machine manufactured in 1999. This led to the need to increase the number of honing operations to remove errors after blade processing in rough and fine boring operations.
When changing technological bases in the existing technological process, additional processing errors arise [3]. So, in the first operation, the main hole is bored by basing on the cast outer cylindrical surface. Accuracy standards 11-0-0-16 in accordance with GOST R 53464-2009 allow displacement of the casting rod up to Δbillet = 1.2 mm. This leads to fluctuations in the boring allowance and, accordingly, to a difference in the value of the cutter squeezing from the workpiece surface Δpart, determined by dependence [10]:
Δpart=ΔbilletjλCpSq
Where j – rigidity of the technological system, N/m; λ – the ratio of the radial component of the cutting force to the tangential; Ср – experimental coefficient, taken constant for a given ratio of the workpiece material to be processed and the cutting material of the tool; S – tool feed for the next cut (workpiece turnover), mm / cut (rev); q – the degree of influence of the feed on the tangential component of the cutting force.
The constituents λ, Ср, and q for calculations according to formula (1) are taken from reference data, which may have a significant error. To study specific operations, it is preferable to use the concept of refinementε, equal to the ratio of the errors of the same name of the workpiece and the machined part and determined by the transformation of formula (1) to this form:
ε=ΔbilletΔpart=jλCpSq
For practical calculations when analyzing the accuracy of technological processes, it is more convenient and easier to use the first part of formula (2) and the value of production refinement.
In order to reduce the deformation of the cylinder of a TMZ series diesel engine, as well as to eliminate the influence of the beating of the tool when processing the inner surface on a TNS-6008 CNC lathe, it is proposed to make a device for basing the part along protruding rib – overlays on the cams. The overlays are made of reinforced textolite, the friction coefficient of which is high (0.3-0.4), as a result of which it is possible to reduce the radial clamping forces by 3-4 times and, accordingly, reduce the elastic deformations of the workpiece under their action.
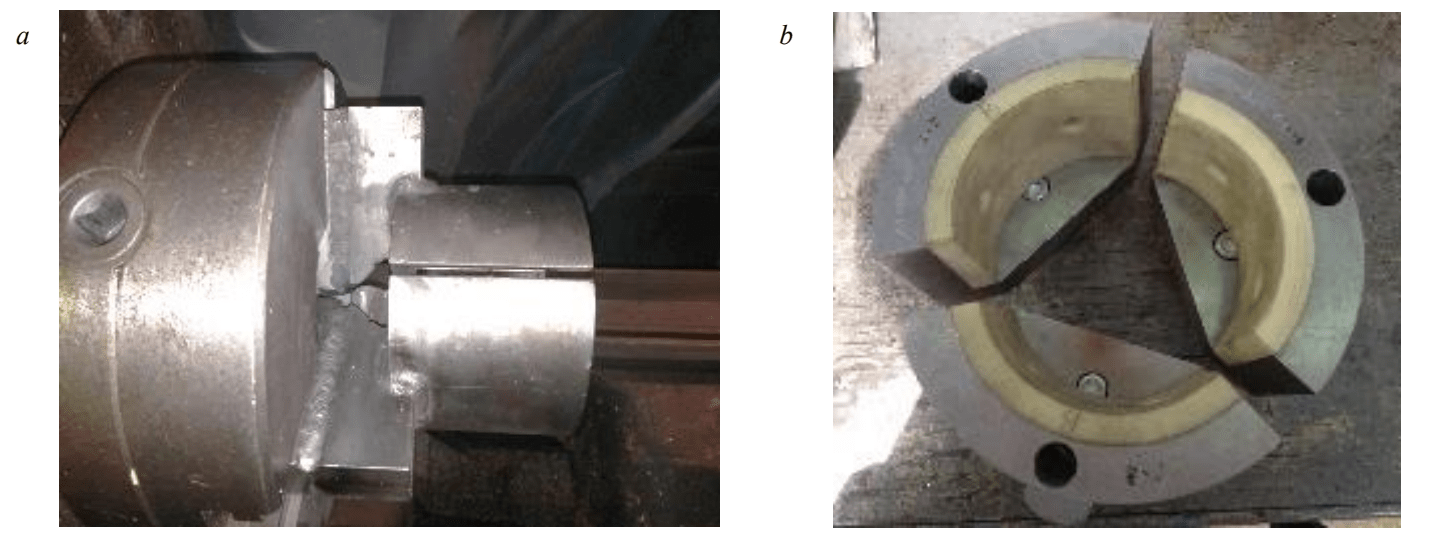
Fig.2. Experimental equipment (a) and equipment of the experimental device (b) for clamping along the ribs of the cylinder
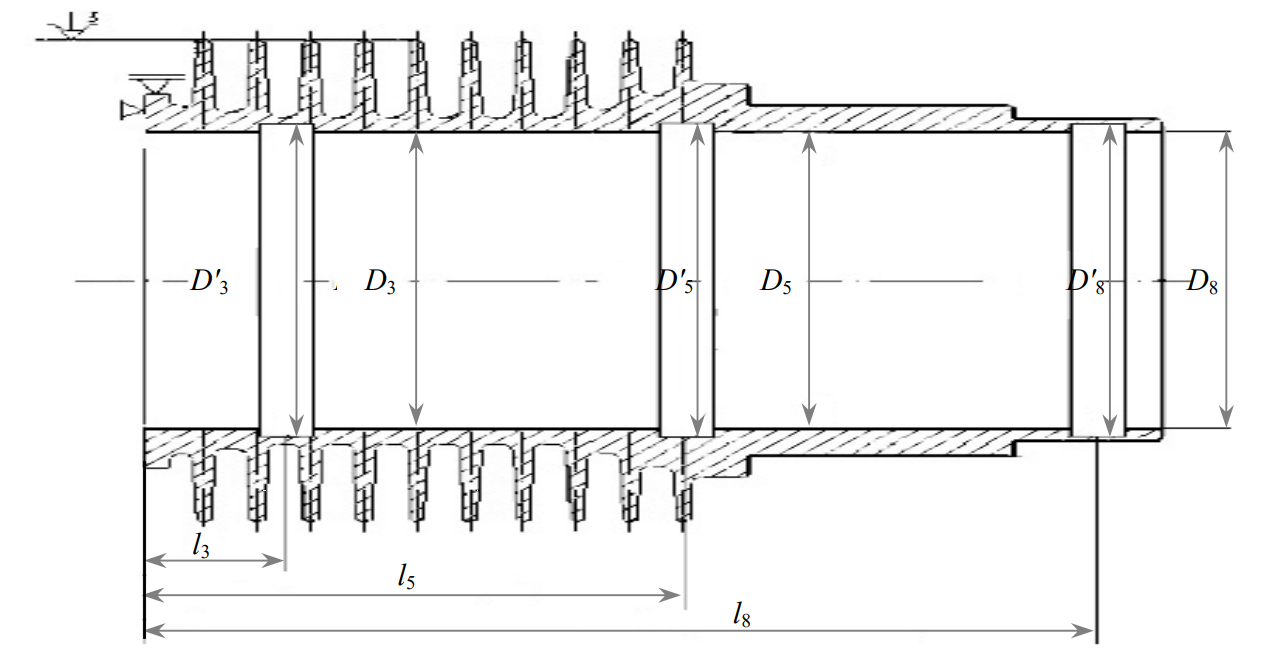
Fig.3. Sketch of the sample for determining the stiffness of the technological CNC lathe systems 16A20F3S39
A photograph of the experimental device installed on the machine is shown in Fig.2, a. The pads on the cams are made in the form of three identical component parts (Fig.2, b), are fastened in a three-jaw chuck and fix the part along the outer diameter (ribs).
The length of the overlays is determined by the distance from the end face of the part to the last edge; it can vary depending on the modification of the part. The optimal width of each pad has been determined – 40 mm.
To determine the refinement, it is customary for a given cutting mode to process stepped surfaces, for example, a specimen with a stepped bore (Fig.3).
The hole was bored to a diameter D, then 3 grooves with a diameter Dʹ were machined at distances l3, l5, l8 from the base end, by analogy with the places of accuracy measurements according to Fig.1. Measured the actual dimensions D3, D'3, D5, D'5, D8, D'8 (table 1).
Table 1
Stepped bore parameters before and after boring
|
Value |
D3 |
D'3 |
D5 |
D'5 |
D8 |
D8 |
|
Beforeboring, mm |
93.65 |
94.68 |
93.62 |
94.64 |
93.22 |
94.23 |
|
Groovedepthti, mm |
0.515 |
0.51 |
0.505 |
|||
|
Afterboring, mm |
94.65 |
94.82 |
94.62 |
94.792 |
94.32 |
94.526 |
|
Groovedepthti, mm |
0.085 |
0.086 |
0.103 |
|||
|
Clarification εi |
6.06 |
5.93 |
4.9 |
|||
The machine is adjusted to the mode specified by the technology: cutting speed V = 94.8 m/min, feed S = 0.14 mm/rev, cutting depth t = 1.5 mm, machined through with a calculated allowance. The actual values of dimensions in longitudinal section E-E: D3, D'3, D5, D'5, D8, D'8 on the l3, l5, l8 distances from the base end are measured, the results are listed in table 1.
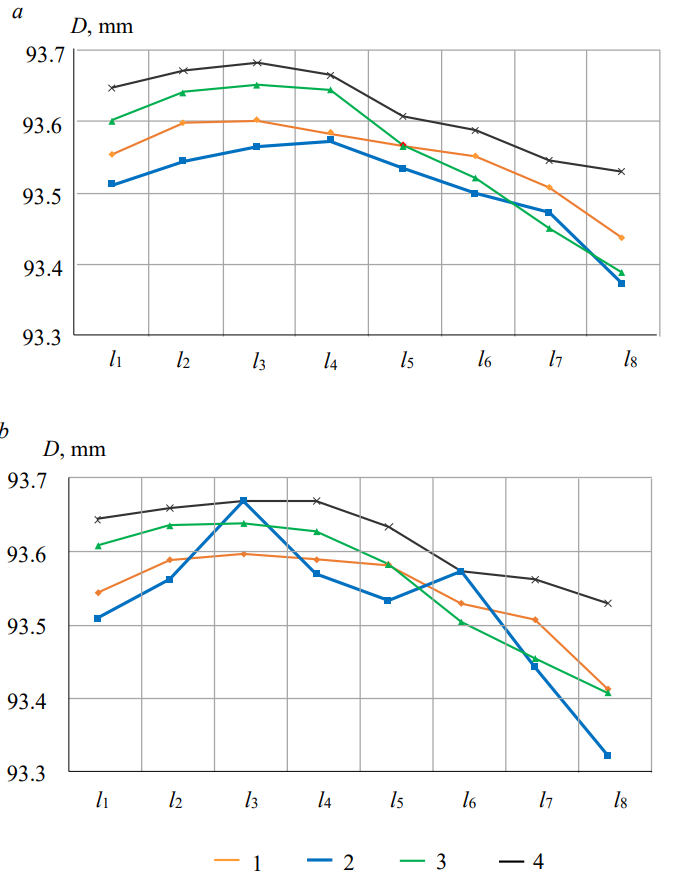
Fig.4. Main hole dimensions after rough boring of stabilizing tempering (a), after two weeks Soaking (b) in sections (Fig.1):
1 – B-B, 2 – C-C, 3 – D-D, 4 – E-E
The groove depths are found from the difference in diameterst3, t5, t8 before boring ti = 0,5(D'i– Di) and after boring tʹ3, tʹ5, tʹ8, clarifications calculated (table 1) $ε_i={t_i \over t_i'}$.
The difference in the obtained values explains the systematic decrease in the inner diameter of the hole along the edges of the part, observed during rough boring (Fig.4, a), especially in the longitudinal section E-E. Figure 1 shows that the rigidity of the casting itself in the longitudinal section E-E is higher than in the others, since the cuts in the cooling ribs for the fastening bolts do not fall into it. The difference in stiffness along the longitudinal sections explains the different behavior of the dimensions in Fig.4, a after rough boring.
After stabilizing aging, carried out in an electric furnace when heated to 180 °C for 8-10 hours, followed by cooling in air to the temperature of the shop, the cross-sectional dimensions change (Fig.4, a).
After two weeks of soaking, the sample was re-measured. The general tendency of changing the dimensions along the sections changed (Fig.4, b). The smallest length l8 was the size in section C-C. The graphs shown in Fig.4 show that the variation in the diameters of the hole cross-sections at the measurement length l8 from the base end decreases from 0.25 mm after rough boring to 0.2 mm after stabilizing tempering and two weeks of soaking. The total spread of dimensions over the entire surface of the hole decreased from 0.35 to 0.3 mm. Comparison of the graphs presented in Fig.4 shows that the fluctuation of the diameters of the hole cross-sections at the measurement length l8 from the base end decreases from 0.25 mm after black boring to 0.2 mm after stabilizing tempering and two weeks of soaking. The total spread of dimensions over the entire surface of the hole has decreased from 0.35 to 0.3 mm.
With such values of the boring operation refinement, workpieces with a size fluctuation in the section l8 from the base end of about 0.05, and over the entire surface – up to 0.075 mm will arrive for honing. These errors will have to be eliminated in subsequent honing operations, nothaving a corrective ability relative to the axis of the hole. This forces us to increase the number of honing operations, introducing two rough honing operations on the 3822OP40 vertical honing machine and three finishing operations on the SS-6062 CNC vertical honing machine.
To eliminate this drawback, it was decided to use a two-position aggregate boring machine ARS-4/Ts for boring operations, on which preliminary and final boring is provided for a single fixing of the cylinder blank. This eliminates positioning errors between transitions and improves overall accuracy by removing two rough honing operations from the process and processing productivity.
Refinement of the technological system of the new modular boring machine ARS-4/Ts in one pass is characterized by the value ε = 10-12. Considering the double execution of boring with a single positioning, it can be assumed that the initial spread of dimensions over the entire surface of the hole decreased from 0.35 mm after boring on a lathe to about 0.003 mm.
To check the declared parameters of the part, after processing on the ARS-4/Ts aggregate boring machine, a batch of 26 cylinders was processed. Some of the measurement results of the pilot batch are shown in Table 2. Measurements were carried out using a coordinate measuring machine in four sections with eight points in each (see Fig.1).
Table 2
Geometric parameters of the cylinder mirror obtained during processing on a modular boring machine with CNC ARS-4/Ts
|
Tested |
Given |
Accuracy parameters obtained during processing |
|
Inner diameter95, mm |
Ø94.92+0,05 |
0.016-0.025mm |
|
Roundnesstolerance, μm |
– |
0.003-0.02mm |
|
Cylindricitytolerance, μm |
10 |
0.009mm |
|
Radial runout tolerance of the inner surface relative |
– |
0.05mm |
|
Roughness, μm |
2.5 |
1.2-1.7 μm |
The results obtained show that the actual errors in the shape of the mirror surface exceed those calculated using formula (1). This is explained by the presence of a locating error when installing on the combined boring operation, as well as the inhomogeneity of the structure of the casting in terms of density and, accordingly, in terms of hardness, which cause fluctuations in the radial component of the cutting force and squeezing the cutter from the surface to be machined [10].
The errors indicated in Table 2 are successfully removed by honing [9, 10]. Such a spread in the dimensions of the workpiece can well be removed in four transitions of one honing operation on a vertical honing machine with CNC SS-6062 (Table 3).
Table 3
Honing modes by transitions
|
Honingtype |
Diamond barparameters |
Peripheral speed |
Reciprocating speed |
Pressure |
Number of working strokes i |
|
Rough |
2768-0029 АС6 125/100 100 М2-01 GOST 25594-83 |
60 |
18 |
1.33 |
var |
|
Finishing |
2768-0029 АСМ 28/20 100 М2-01 GOST 25594-83 |
45 |
16.2 |
0.51 |
3 |
|
Meshapplication |
2768-0029 АС6 125/100 100 М2-01 GOST 25594-83 |
60 |
18 |
1.33 |
7 |
|
Flat-topped |
БП 25х6х100 63С 6-Н С2-33 7Б А GOST 2456-82 |
40.2 |
13.8 |
0.51 |
3 |
Taking into account the results of the study, the following route of processing the cylinder mirror of a diesel engine was proposed (Table 4).
Due to the heterogeneity of the structure of the casting after the first, artificial aging, the billets are naturally deposited in the warehouse for six months [9]. Research [9, 10] has shown, that the introduction of natural aging provides a smaller deviation in the dimensions of the inner diameter of parts than on parts without it. Stabilizing aging is also perfor med in a mine electric furnace, heating for 8-10 hours to a temperature of 180 °C, then cooling in air. Diameter deviations after a single honingdo not exceed 0.025, and the deviation from roundness is 0.006 mm, which fits into the specified tolerance (Fig.5).
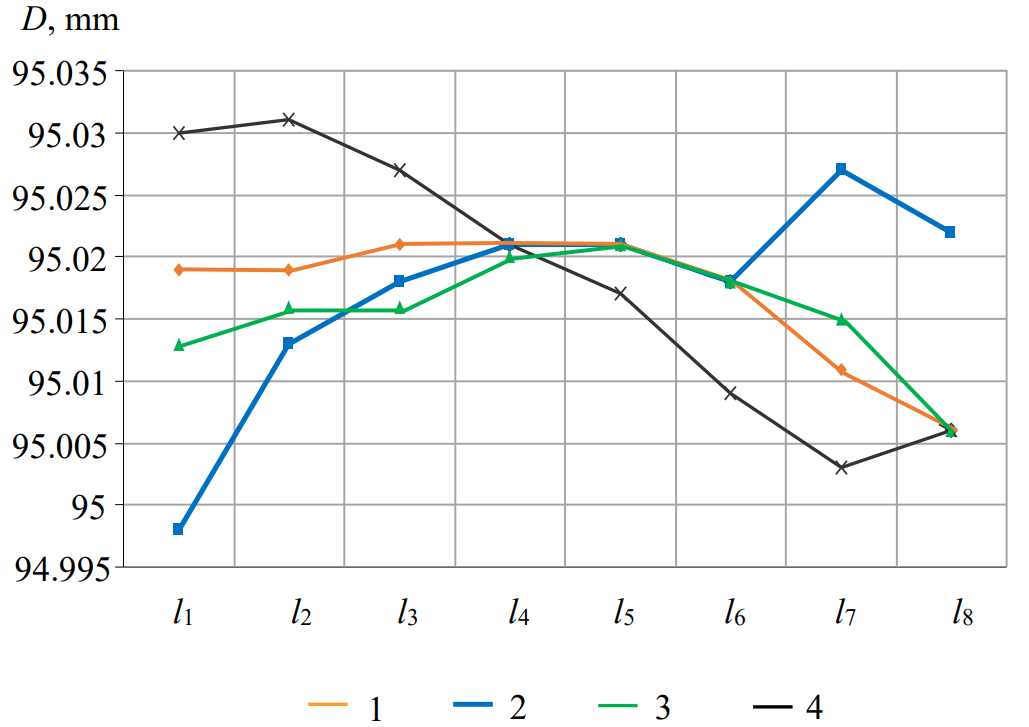
Fig.5. Dimensions of the main hole after honing in sections (Fig.1): 1 – B-B, 2 – C-C, 3 – D-D, 4 – E-E
Table 4
The list of operations for processing the diesel engine cylinder mirror of a newly developed technological process
|
Operationname |
Equipment model |
|
CNC lathe |
CNC lathe 1ТНС-6008 |
|
Artificialaging |
Mineelectricfurnace |
|
Natural aging |
Shelvinginthewarehouse |
|
Boring (pre-boring and fine boring) |
Aggregate boring machine ARS-4/Ts |
|
Stabilizingaging |
Mineelectricfurnace |
|
Honing CNC |
Honing CNC CC740B2 |
Table 5
Requiredprofileparameters
|
Relative reference length of the profile tp, % |
20 |
30 |
50 |
70 |
80 |
90 |
100 |
|
Section level of profile C, μm |
0-0.062 |
0.14-0.96 |
0.4-1.35 |
0.7-1.8 |
0.8-2.7 |
2.1-5.4 |
5.0-8.0 |
After honing and two weeks of soaking, the size of the main hole does not change significantly. This effect is ensured by the use of abundant cooling of the cooling lubricant Ivnetiks 1-12 TU 0258-369-05744685-2013 during honing. At the finishing transition, the surface of the cylinder mirror is brought to the required quality by the specified Abbott - Firestone diagram (Fig.6).
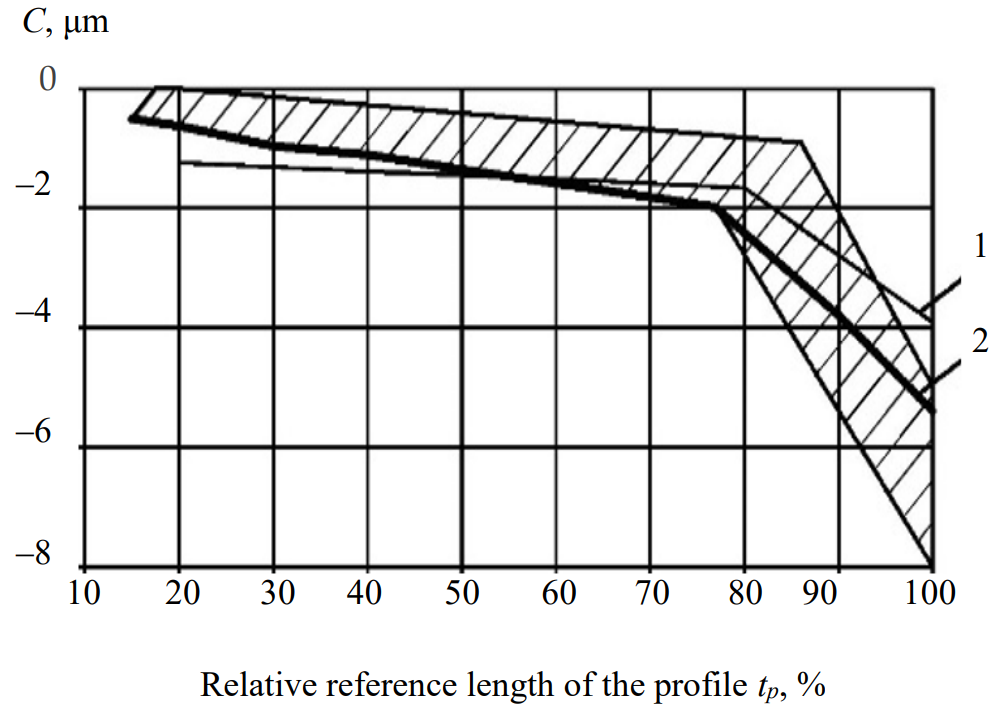
Fig.6. Abbott – Firestone diagram parameters 1 – actual, 2 – calculated
To control the quality of the surface of the cylinder mirror, according to the design documentation, the requirement is laid down: the microgeometry of the cylinder mirror should be a sparse grid of depressions in depth corresponding to the Abbott – Firestone diagram, measurements for tp are made from 20 % (Table 5).
As can be seen from Fig.6, the actual Abbott – Firestone diagram at the beginning (up to the value of the relative reference profile length tp = 30 %) goes beyond the specified boundaries, differing from the calculated diagram.
Conclusion. Analysis of the drawing and manufacturing technology of the TMZ-450D diesel engine cylinder showed that the design of the cylinder is low-tech due to the complex shape of the cooling fins and the thinness of the cylinder itself. This, in combination with the inhomogeneity of the density of the casting metal, leads to a distortion of the hole shape obtained in cutting operations.
The combination of semi-finishing and fine boring on a two-position modular boring machine significantly increases the accuracy of the bore hole, which makes it possible to reduce the number of honing operations.
Due to the incomplete compliance of the surface quality with the Abbott – Firestone reference diagram, increased wear of the cylinder bore surface is expected during the running-in period.
References
- Bezyazychnyi V.F., Scherek M. Thermal processes research development in machine-building technology. Journal of Mining Institute. 2018. Vol. 232, p. 395-400. DOI: 10.31897/PMI.2018.4.395
- Vasin S.A., Plakhotnikova E.V. Electric drive setting torque calculation method in electric drive shut-off valve system with rectilinea displacement of the valve closure. Journal of Mining Institute. 2018. Vol. 232, p. 407-412. DOI: 10.31897/PMI.2018.4.407
- Maksarov V.V., Leonidov P.V. Modeling and control of dynamical properties of the technological systems. Journal of Mining Institute. 2014. Vol. 209, p. 71-77 (in Russian).
- Halderman J.D., Mitchell Ch.D. Automotive Engines: Theory and Servicing, 4th edition. Prentice Hall, 2004, p. 559.
- Olt Yu., Maksarov V.V., Krasnyy V.A. Provision of adhesion strength of gasthermal coatings on piston rings of quarry transport engines. Journal of Mining Institute. 2018. Vol. 229, p. 77-83. DOI: 10.25515/PMI.2018.1.77
- KholdermanD.D., MitchellCh.D. Automotive engines: theory and maintenance. Moscow: Vilyams, 2006, p. 660(in Russian).
- Babichev A.P., PolyanchikovYu.N., Slavin A.V. et al. Honing: Monograph. Volgograd: Volgogradskiigosudar-stvennyiarkhitekturno-stroitelnyiuniversitet, 2013, p. 245(in Russian).
- Yamnikov A.S., Safarova L.L. Improving engine cylinder mirror processing performance. Chernye Metally. 2020. N 9, p. 68-72 (in Russian).
- Yamnikov A.S., Safarova L.L. Synthesis of the Abbott diagram. News of the Tula state university. Technical sciences. 2018. N 8, p. 30-35 (in Russian).
- Yamnikov A.S., Safarova L.L. Reducing the influence of technological heredity on the accuracy of honed cylinder workpieces using natural aging. Chernye Metally. 2019. N 11, p. 47-51 (in Russian).
- Biswas S., Monroe C., Prucha T. Use of published experimental results to validate approaches to gray and ductile iron mechanical properties prediction. International Journal of Metalcasting. 2017. Vol. 11, p. 656-674. DOI: 10.1007/s40962-016-0126-3
- Joliet R., Kansteiner M., Kersting P. A process model for force-controlled honing simulations. Procedia CIRP. 2015. Vol. 28, p. 46-51. DOI: 10.1016/j.procir.2015.04.009
- Gao S., Yang C., Xu J. et al. Modelling and simulation of bore diameter evolution in finish honing. Procedia Manufacturing. 2018. Vol. 26, p. 462-468. DOI: 10.1016/j.promfg.2018.07.054
- Moos U., Bahre D. Analysis of process forces for the precision honing of small bores. Procedia CIRP. 2015. Vol. 31, p. 387-392. DOI: 10.1016/j.procir.2015.03.066
- Gromczyk М., Kondracki М., Studnicki А., Szajnar D. Stereological analysis of carbides in hypoeutectic chromium cast iron. Archives of Foundry Engineering. 2015. Vol. 15. Iss. 2, p. 17-22. DOI: 10.1515/afe-2015-0030
- Zhenting W., HongmingG. Investigation on microstructure and wear resistance of the new Cr-W-Mo-V high-alloy wear resistant cast iron. Advanced Materials Research. 2015. Vol. 1061-1062, p. 670-673. DOI: 10.4028/www.scientific.net/AMR.1061-1062.670
